

Remix Authentication
Easily add secure, edge- and SSR-friendly authentication to Remix with Clerk.
Overview
Clerk is the easiest way to add authentication and user management to your React application. This guide will walk you through the necessary steps to install and use Clerk in a new Remix application.
After following this guide, you should have a working Remix app complete with:
- Fully fledged sign in and sign up flows.
- Google Social Login.
- Secure email/password authentication.
- A prebuilt user profile page.
Looking for a quicker start? Check out the Clerk + Remix starter repo
Before you start
Before you start, you need to set up your application in your Clerk Dashboard. For more information, check out our Set up your application guide.
Create a Remix application
Start by creating a new Remix application with the npx CLI:
npx create-remix@latest
Choose a directory to create the app and follow these prompts:
- For app type, select "Just the basics"
- For deployment target, select "Remix App Server"
Need more help? The Remix documentation goes into more detail about creating applications.
Installing Clerk
Once you have a Remix application ready, you need to install Clerk's Remix SDK. This gives you access to our prebuilt components and hooks for React, as well as our helpers for Remix loaders.
1# Navigate to your application's root directory2cd yourapp34# Install the clerk/remix package5npm install @clerk/remix
To add environment variables to a Remix application, create a file named .env in the root directory of your project and add your keys there.
.env1
Initialize Clerk in app/root.tsx
In Remix, app/root.tsx wraps your entire application in both server and browser contexts. Clerk requires three modifications to this file so we can share the authentication state with your Remix routes.
First, we must define a root loader.
app/root.tsx1// Add imports2import type { LoaderFunction } from "@remix-run/node";3import { rootAuthLoader } from "@clerk/remix/ssr.server";45// Define and export your loader6export const loader: LoaderFunction = (args) => rootAuthLoader(args);7
If you'd like to load additional data, you can pass your own loader directly to rootAuthLoader.
app/root.tsx1// Add imports2import type { LoaderFunction } from "@remix-run/node";3import { rootAuthLoader } from "@clerk/remix/ssr.server";45// Define and export your loader6export const loader: LoaderFunction = args => {7return rootAuthLoader(args, ({ request }) => {8const { sessionId, userId, getToken } = request.auth;9// fetch data10return { yourData: 'here' };11});12};
Wrap your App with ClerkApp
Clerk provides a ClerkApp wrapper to provide the authentication state to your React tree. This helper works with Remix SSR out-of-the-box and follows the "higher-order component" paradigm.
First, update App so it is not exported as the default module. Then, wrap App with ClerkApp:
app/root.tsx1// add import2import { ClerkApp } from "@clerk/remix";34// Remove "export default" from in front of `function App() {`5function App() {6...7}89// Followed by exporting the "wrapped" App10export default ClerkApp(App);
Set ClerkCatchBoundary
Clerk uses Remix's catch boundary in root.tsx to refresh expired authentication tokens.
app/root.tsx1// add import2import { ClerkCatchBoundary } from "@clerk/remix";34// define boundary5export const CatchBoundary = ClerkCatchBoundary();
You can also add your own boundary, simply by passing it as an argument.
app/root.tsx1// add import2import { ClerkCatchBoundary } from "@clerk/remix";34// define boundary5export const CatchBoundary = ClerkCatchBoundary(YourBoundary);
To run your app, start the development server and navigate to http://localhost:3000
1npm run dev
Clerk is installed, but you still have to configure your application to actually use authentication. Read on to learn how to protect pages, API routes, and more.
Access authentication data
Once installation is complete, Clerk can seamlessly authenticates users across all three Remix contexts:
- React pages
- Loaders
- Actions
Each context has access to Clerk's auth singleton, which contains the data necessary for authentication and data loading:
userId: The ID of the active user, ornullwhen signed out. In data-loaders, this is often the only piece of information needed to securely retrieve the data associated with a request.sessionId: The ID of the active session, ornullwhen signed out. This is primarily used in audit logs to enable device-level granularity instead of user-level.getToken({ template?: string; }): Retrieves a signed JWT that is structured according to the corresponding JWT template in your dashboard. If no template parameter is provided, the default Clerk session JWT is returned.
Using React
In React, the auth singleton is available via the useAuth hook:
1import { useAuth } from "@clerk/remix";23const { userId, sessionId, getToken } = useAuth();
Loaders and actions
In loaders and actions, the auth singleton is available via the getAuth helper.
1import { getAuth } from "@clerk/remix/ssr.server";23export const loader: LoaderFunction = async (args) => {4const { userId, sessionId, getToken } = await getAuth(args);5// fetch data6return { yourData: 'here' };7}
Protecting routes
To protect a route from signed out users, simply add a redirect to your loader if no userId is found in the auth singleton:
1export const loader: LoaderFunction = async (args) => {2const { userId, sessionId } = await getAuth(args);3if(!userId){4return redirect("https://accounts.foo.bar.lcl.dev/sign-in");5}6// Your loader here7}
Enabling full server-side rendering
To make auth as fast as possible, Clerk uses short-lived stateless JWT tokens by default, requiring no network requests.
If desired, Clerk’s complete User objects can also be retrieved during SSR. Since these objects require network requests to retrieve, so you need to explicitly enable server-side user fetching by passing a flag to the root loader:
1import { rootAuthLoader } from "@clerk/remix/ssr.server";23export const loader: LoaderFunction = (args) => {4return rootAuthLoader(args, { loadUser: true });5};67// or, if you also need a custom loader handler:8export const loader: LoaderFunction = (args) => {9return rootAuthLoader(10args,11({ request }) => {12const { userId } = request.auth;13// fetch data14return { yourData: 'here' };15},16{ loadUser: true }17);18};19
This makes the entire User object available to your components during SSR, allowing the whole app to be rendered on the server side.
Data fetching
Fetching data from Clerk Backend API is now done as shown in the following snippet:
1import { createClerkClient } from '@clerk/remix/api.server';23const { lastName, id, lastSignInAt } = await createClerkClient({4apiKey: 'YOUR_API_KEY_GOES_HERE'5}).users.getUser('USER_ID_GOES_HERE');67console.log(`User with id ${id} last sign in was ${lastSignInAt}`);
Using Clerk Hosted Pages
If you're looking for the fastest way to implement a full-stack authentication into your site, you can leverage Clerk Hosted Pages for your sign up, sign in, and user profile pages.
You can easily define how you want your users to sign in and sign up in the User & Authentication settings page.
By default, the URLs for your hosted pages will match the following pattern:
https://accounts.[your-domain].com/sign-inhttps://accounts.[your-domain].com/sign-uphttps://accounts.[your-domain].com/user
For development instances, Clerk will issue you a domain on *.clerk.accounts.dev In production, you'll need to supply your own domain. See Production setup or more information.
Clerk provides SDKs to make navigating to these pages easy.
1import {2RedirectToSignIn,3RedirectToSignUp4} from "@clerk/remix";5// Rendering the RedirectToSignIn component will6// cause the browser to navigate to the Sign in7// URL and show the Sign In Clerk Hosted Page.8function App() {9return <RedirectToSignIn />;10}1112// Rendering the RedirectToSignUp component will13// cause the browser to navigate to the Sign up URL14// and show the Sign up Clerk Hosted Page.15function App() {16return <RedirectToSignUp />;17}
1// redirectToSignIn will cause the browser to2// visit the Clerk Hosted Pages Sign in URL.3window.Clerk.redirectToSignIn();45// redirectToSignUp will cause the browser to6// visit the Clerk Hosted Pages Sign up URL.7window.Clerk.redirectToSignUp();
Using Clerk Components
If you want more control over the look and feel of your sign in and sign up experience but don't want to completely build one from scratch, you can use the pre-built Clerk Components.
Clerk provides <SignIn />, <SignUp /> and <UserProfile /> components that render entire flows. Using these, Clerk will take care of everything from verifying the user's email address to letting your user add 2FA. These in conjunction with Remix's router gives you a complete solution that's surprisingly easy to implement and is completely customizable via CSS.
Sign up Pages
app/routes/sign-up/$.tsx1import { SignUp } from "@clerk/remix";23export default function SignUpPage() {4return (5<div style={{ border: "2px solid blue", padding: "2rem" }}>6<h1>Sign Up route</h1>7<SignUp routing={"path"} path={"/sign-up"} />8</div>9);10}
Sign in Pages
app/routes/sign-in/$.tsx1import { SignIn } from "@clerk/remix";23export default function SignInPage() {4return (5<div style={{ border: "2px solid blue", padding: "2rem" }}>6<h1>Sign In route</h1>7<SignIn routing={"path"} path={"/sign-in"} />8</div>9);10}
Once these files have been added, re-run `npm run dev` and navigate to localhost:3000/sign-in
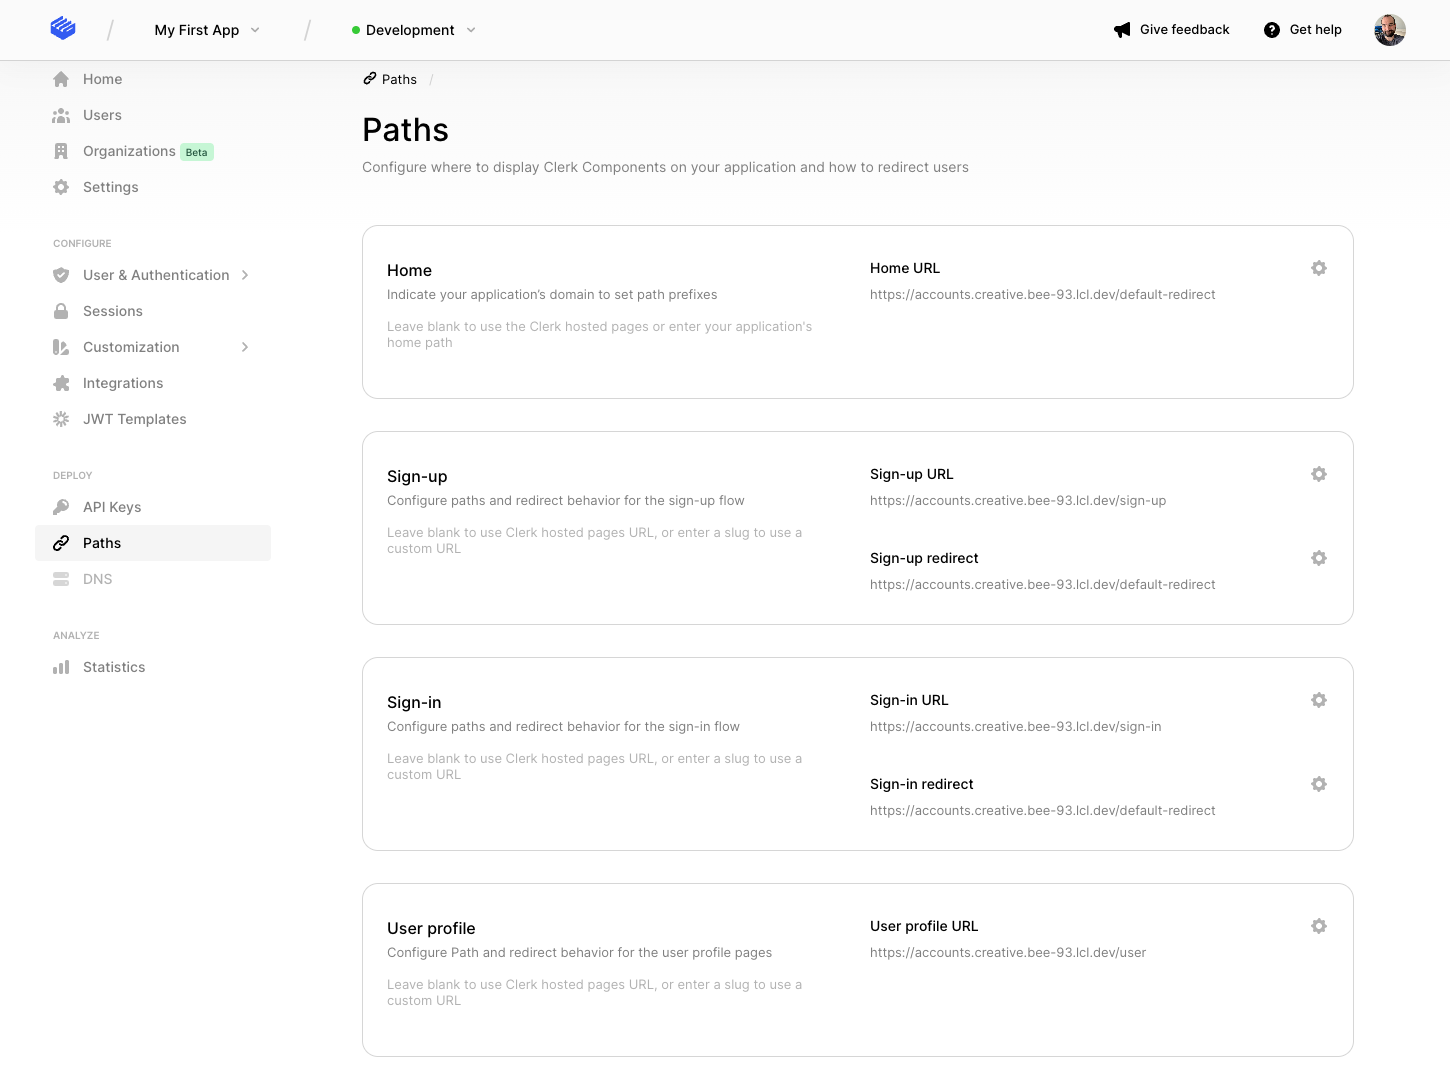
In order to make the links on the modal work, you'll need to set these in the Clerk Dashboard on the Paths page of your instance
For more details on the available component options as well as how you can customize them, please visit the <SignUp /> and <SignIn /> component guides.
Edge runtimes
The latest @clerk/remix package (>=2.0.0) works across all Remix runtimes such as Node, Cloudflare Workers, Cloudflare Pages, and Deno.
If you are upgrading from @clerk/remix version 1.x to 2.x, you should refactor these breaking changes.
Next steps
You now have a working Remix + Clerk app. Going forward, you can:
- Check out the clerk-remix-starter template
- Learn more about the Clerk Components and the Clerk Hosted Pages.
- When you're ready, learn how to deploy your app to production.
- Get support or at least say hi in our Discord channel 👋